
Three Ways to Build a 3D Dockside Repair Shop
Back to boardI needed a small repair shop where players could stop to fix their gear after fishing. They had to be able to spot it from a distance and see the workbench and tools as they approached. I tried three methods with a text prompt first, then added the same concept art to see how each result changed.
Building with Three Methods Using Only Text
All three methods started with the same brief, summarized here.
Build a small repair kiosk for the docks in a Roblox fishing game. Include a workbench, tool storage, and a small light. Use materials that fit a coastal village.
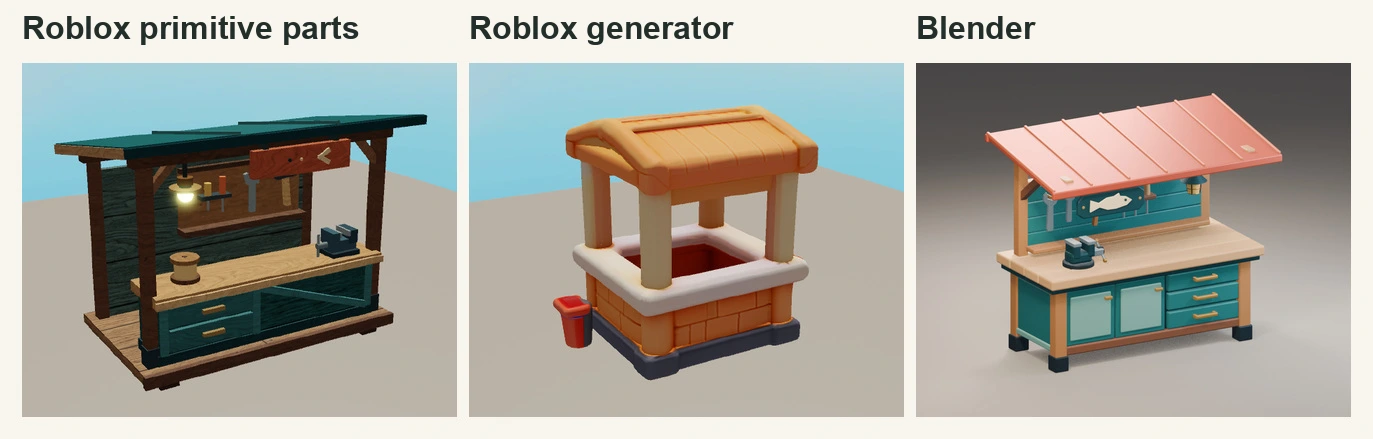
Roblox primitives. I assembled blocks, cylinders, and other basic shapes into a kiosk with a teal roof and a workbench with a vise. Tools hanging between the posts make it easy to recognize as a repair shop. To widen the worktop or move the lantern, I can select and edit just the part I need in Studio.
Roblox generator. I sent the text prompt to GenerationService in Studio and generated a single mesh. It came back as a stall with an orange roof, a white countertop, and four posts. The stall is easy to recognize, but few tools are visible from the front. Someone seeing it for the first time might miss that it’s a repair shop.
Blender. I used Python code written by GPT-6.2 Astra to model a salmon-colored roof, teal drawers, and a vise on the workbench. I could refine details down to the roof seams and drawer handles. The first thing that catches your eye is the vise on the wide, mostly empty worktop.
Adding Concept Art and Repeating the Three Methods
The reference image immediately drew attention to the teal, shell-shaped roof, two life rings on the side, and a lantern extending past the eaves. Those shapes and placements are hard to pin down with a phrase like “fit a coastal village.”
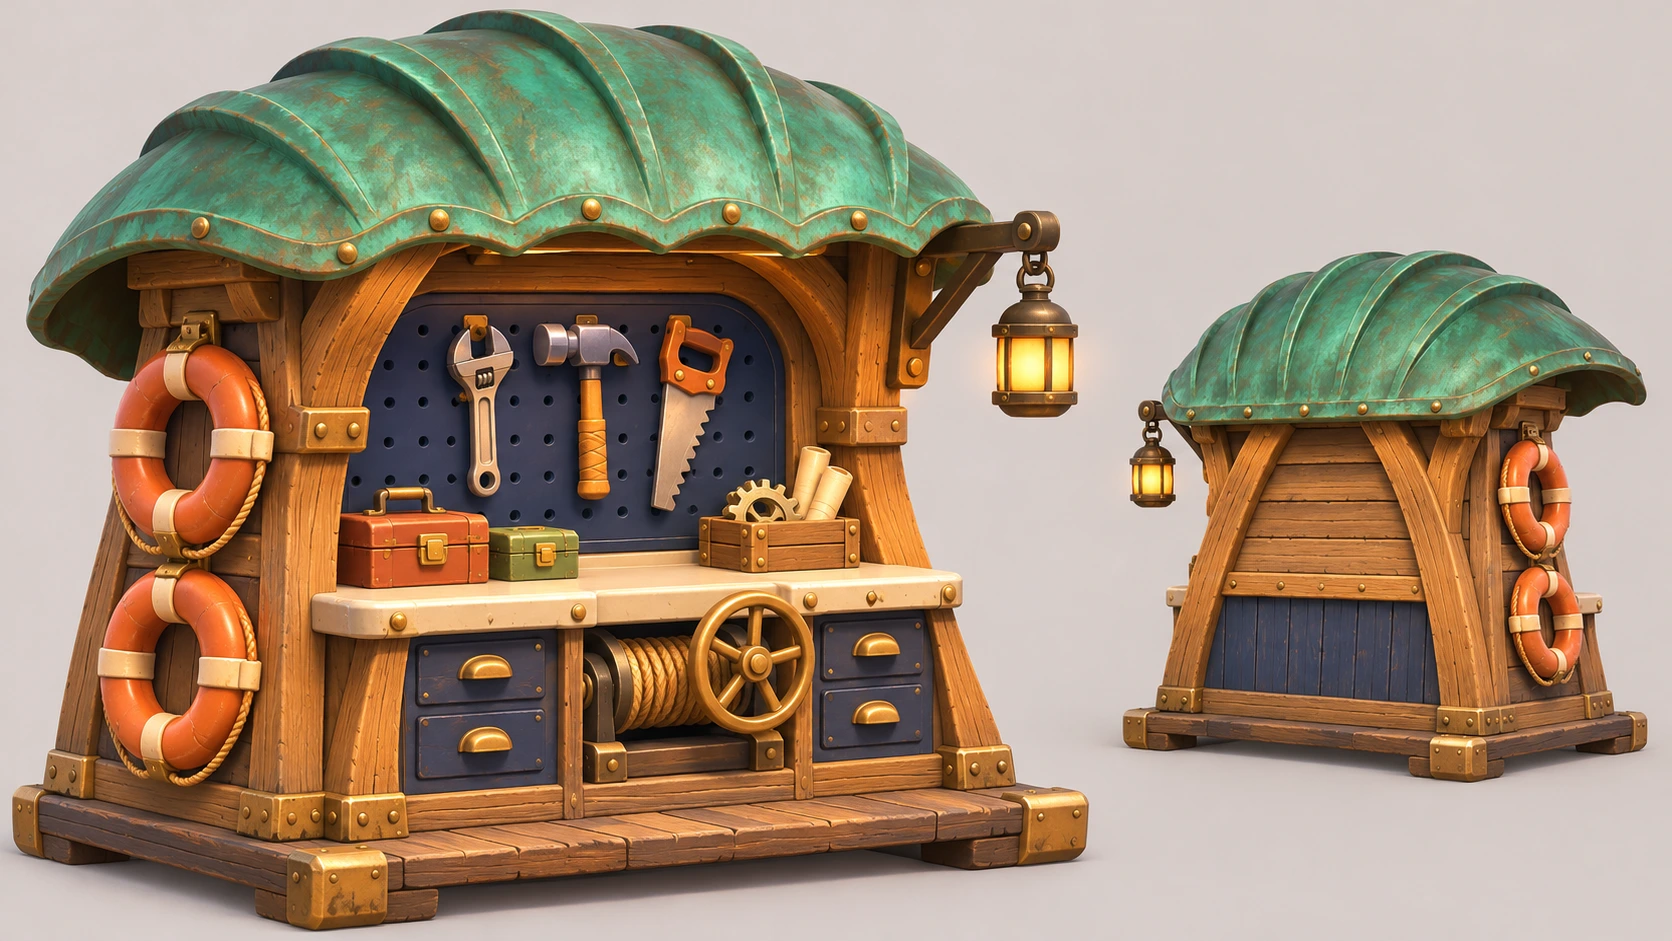
For the Roblox primitives and Blender builds, I used the full concept image with both views. For the Roblox generator, I cropped the front view from the same image, uploaded it to Roblox as an image asset, and supplied it with the prompt. Each method used the original text unchanged.
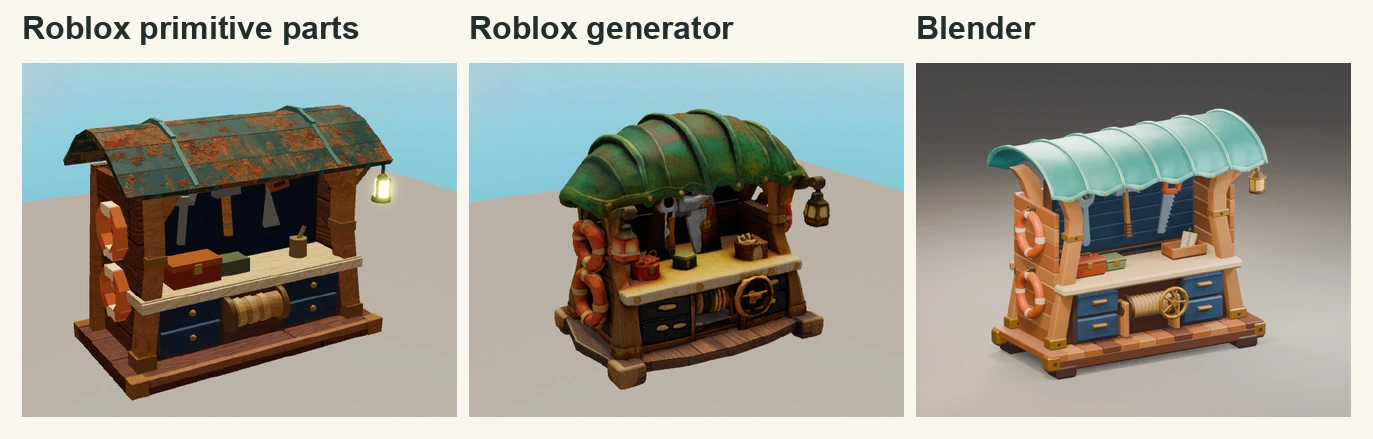
Roblox primitives. I curved the previously flat roof and added rope beneath the workbench. On the side, I joined small parts to make two life rings. The part count rose from 75 to 104. The reference-based build went slightly over the original 100-part target, and I captured it as built.
Roblox generator. This time the generator produced a repair shop with a teal, shell-shaped roof, hanging tools, life rings, and coiled rope in place of the orange stall. You can tell what the shop is for from the front. I made one request for each condition, text only and text with concept art, and got one model from each.
Blender. GPT-6.2 Astra’s flat metal roof became a curved teal roof. Two life rings appeared on the side, with rope and handles beneath the workbench. The three distinctive details from the concept were easy to pick out even from an angled view.
All Six Results at a Glance
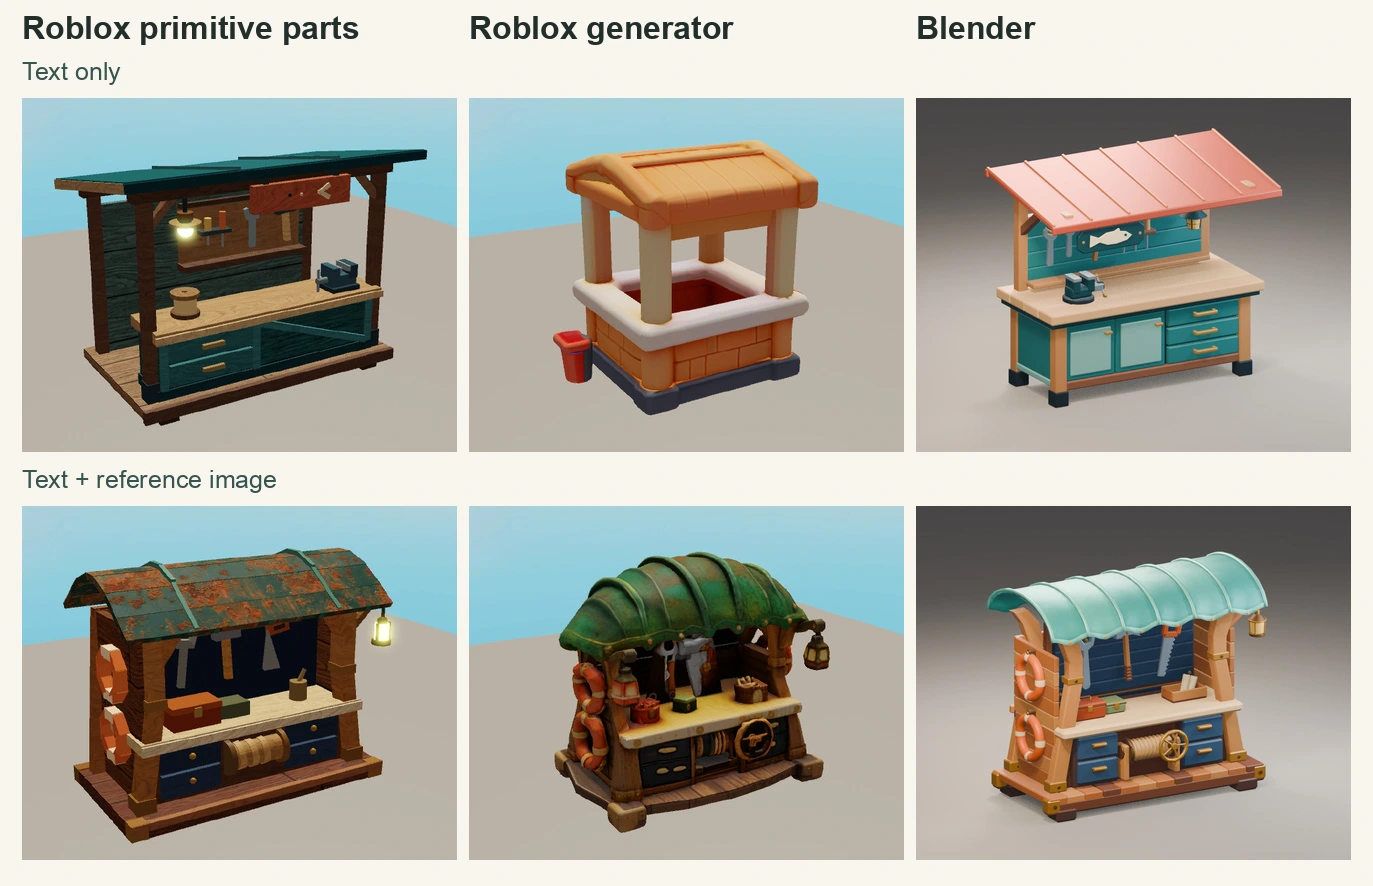
Comparing the top and bottom of each column, the versions made with concept art do a better job of showing what kind of repair shop I was after across all three methods. I captured the builds made with Roblox primitives and the Roblox generator in Studio, and the Blender models in Blender. I matched the camera and lighting within each method and displayed the models at similar heights in the comparison.
GPT-6.2 Astra and GPT-6.2 Sol in Blender with the Same Concept Art
I gave both models the same text and full concept image, used the same reasoning settings, and ran one Blender build with each.
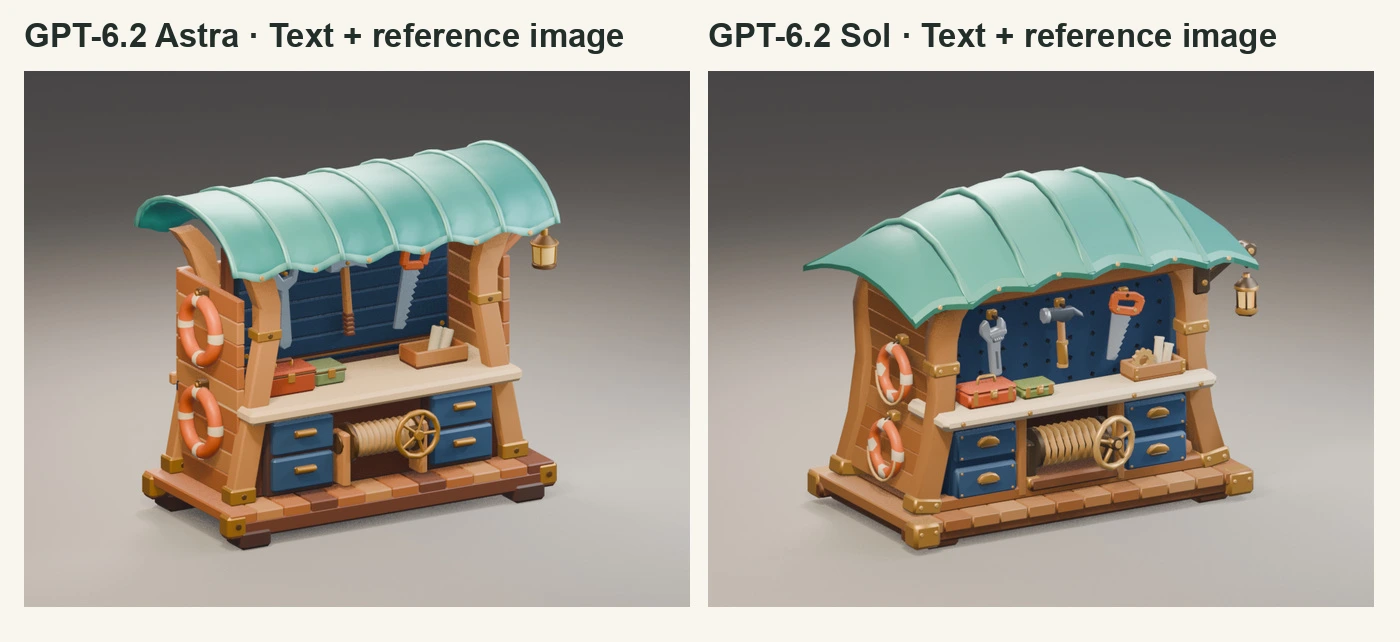
Both kept the overall placement of the roof, life rings, and lantern. GPT-6.2 Astra made a rounded, curled roof with thick seams and a tool board divided into horizontal sections. GPT-6.2 Sol made wider eaves, and small holes were visible in its tool board. Its drawer handles were also closer to the half-moon shape in the reference.
The reference-based GPT-6.2 Astra model started at 25,120 triangles, and GPT-6.2 Sol started at 21,696. After the same mesh reduction in Blender, they came in at 15,524 and 15,619 triangles, respectively. The GPT-6.2 Sol script initially stopped when it exceeded the triangle budget. I changed only that check so it logged the overage, then applied the same reduction to the geometry the script had created. These differences reflect the two runs shown here.
Checking the Kiosk’s Scale in Studio
I matched the models’ on-screen heights in the comparison so their shapes were easy to see. Placing them beside a player reveals how different their scale can feel. I measured the reference-based Roblox generator model with WEPPY and found it was 1.77 studs tall. Next to a player reference model about 5 studs tall, it looked like a miniature, with the workbench below knee level.
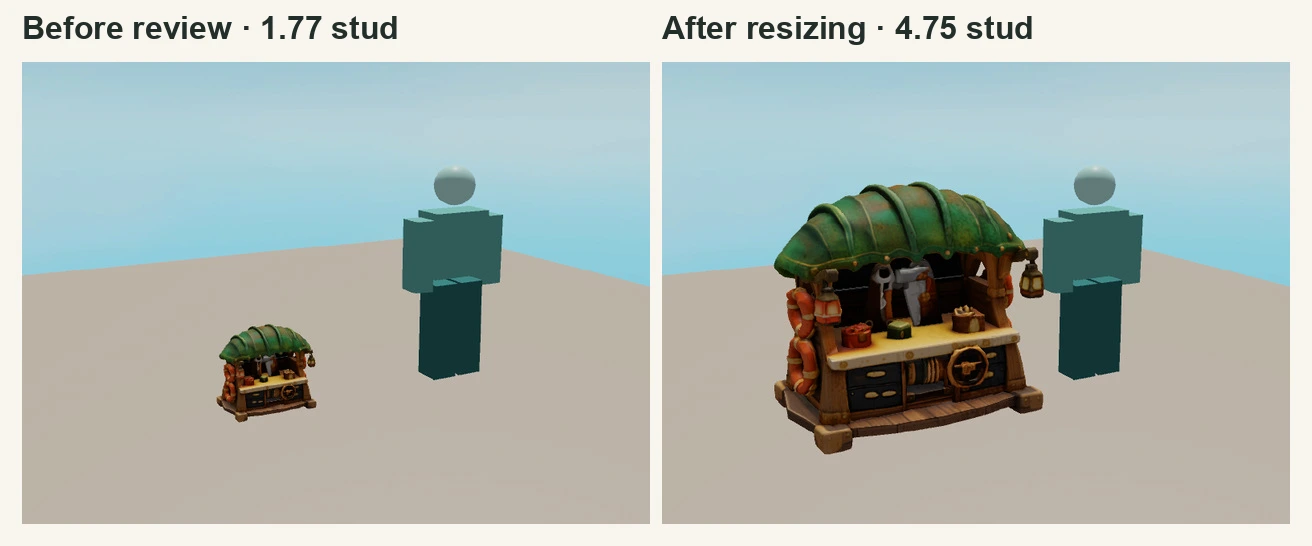
I scaled the kiosk to the target height of 4.75 studs, kept its proportions and materials, and placed it back on the floor. From the same camera angle, the workbench on the right now reaches torso height, so it looks like a place where players could drop off their gear. Once you pick a model, you can ask WEPPY to upload it as a Roblox asset and check its ID.
Trying the Same Concept Art in a Dedicated 3D Generator
Meshy 6 Lite built the geometry from the same front view I sent to the Roblox generator, then used that image again to texture the model. Of the four methods, it captured the most surface detail in the roof’s patches of patina, the grain on the wooden posts, and the shine of the metal handles.
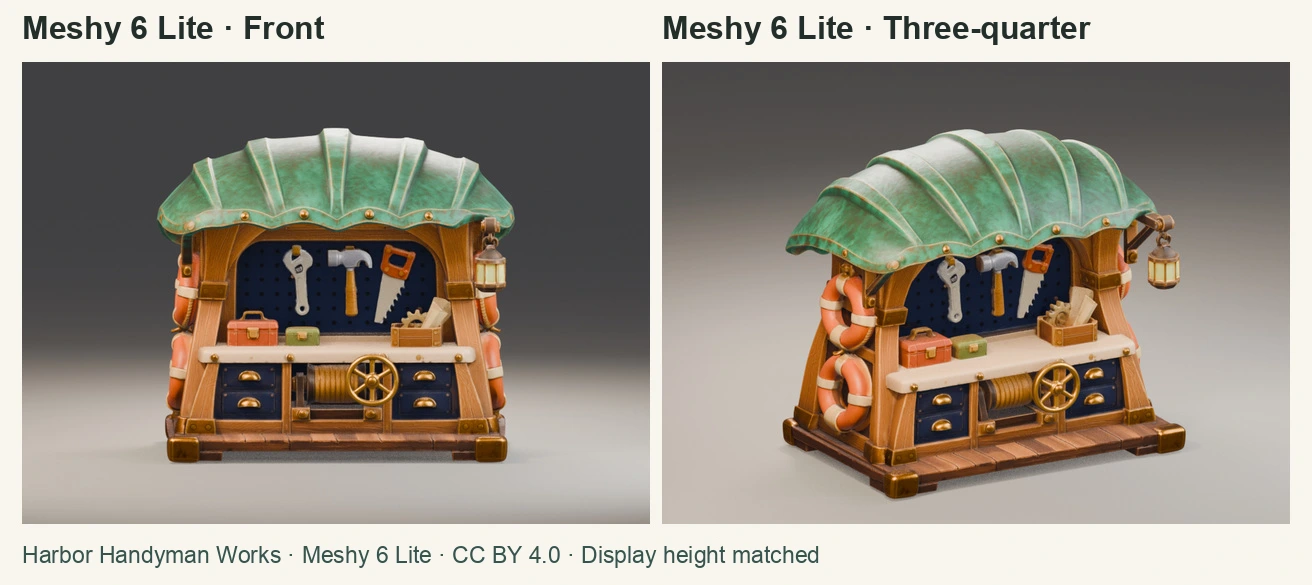
I opened the textured GLB in Blender and found 380,848 triangles and three 2,048 × 2,048 texture images. That’s about 24 times the triangle count of the Blender models made with concept art. I paid extra for the dedicated generator to get that level of surface detail. To use the model in a game, I’d reduce the mesh while preserving the roof’s curves and the life rings, then check the materials again.
For a first playtest, I’d build the shop from primitives and check whether players can spot it from the path and reach the workbench easily. In this comparison, the reference-based Roblox generator and Blender models both showed enough of the shell-shaped roof, life rings, and tools to read as repair shops. For most props, I’d check the results from these methods in Studio and use them there. For a prominent repair shop that players spend time looking at up close, I’d weigh the dedicated generator’s added cost and post-processing time if details like patina or wood grain matter.
The Meshy comparison model is Harbor Handyman Works. I matched the display height of the downloaded GLB and rendered it in Blender. Meshy model creation tool https://www.meshy.ai/ · CC BY 4.0 https://creativecommons.org/licenses/by/4.0/